


Special Products
Featured Products
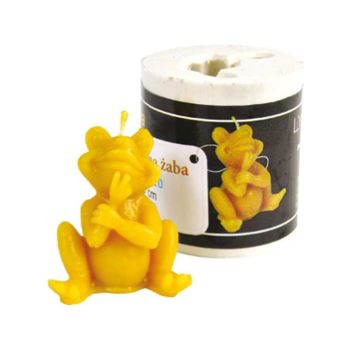
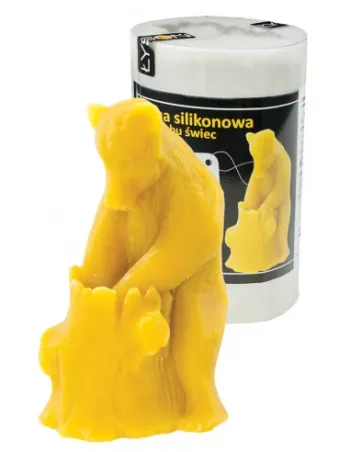
To make your own beeswax candle you will need: - a silicone mold- a wick of appropriate thickness- a rubber band- a toothpick- silicone (Spray) - optional
1) Preparing the mold: We recommend spraying the mold inside with silicone spray which will make it easier to remove the candle at the end of the process. Insert the wick in the center from the bottom and pop it out from the top. Secure the mold with rubber bands to keep it tightly closed. Tie a wick to the toothpick and rest the latter on the top edge.
2) Fill the mold ocn the wax: Melt the wax in a preferably enameled pot, pour it into the mold when it has reached a temperature of 50°C. Pour it slowly into the mold. The time for the wax to solidify depends on the size of the mold and the amount of wax used.
3) Take the candle out of the mold: When the wax is cold, remove the rubber bands, open the mold and take out the candle. Remove the toothpick and cut the wick at the base of the candle, while on the top leave the wick 1 cm long. Spray the candle with silicone spray to give it shine.
€28.00Price
€28.00Price
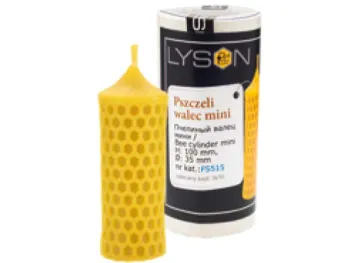
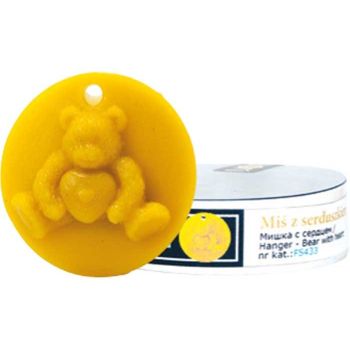
Mold dimensions:
Height: 110 mm
Diameter: 53 mm
Weight: 0.22 kg
Candle dimensions:
Height: 110 mm
Diameter: 35 mm
Weight of wax: 60 g
Wick: 3x10
Silicone molds can be used for processing different raw materials: beeswax, soy wax, palm wax, kerosene, epoxy, soap base.
They are not suitable for food production.
€28.00Price
Mold dimensions:
Height: 110 mm
Diameter: 53 mm
Weight: 0.22 kg
Candle dimensions:
Height: 110 mm
Diameter: 35 mm
Weight of wax: 60 g
Wick: 3x10
Silicone molds can be used for processing different raw materials: beeswax, soy wax, palm wax, kerosene, epoxy, soap base.
They are not suitable for food production.
€28.00Price
€17.00Price
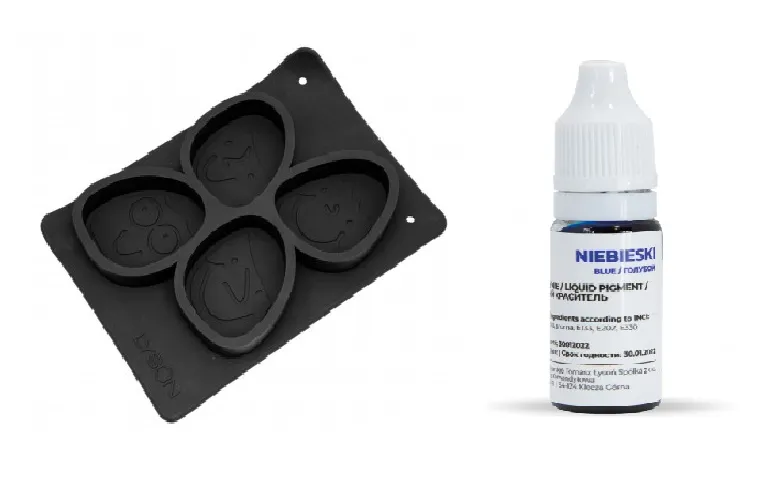
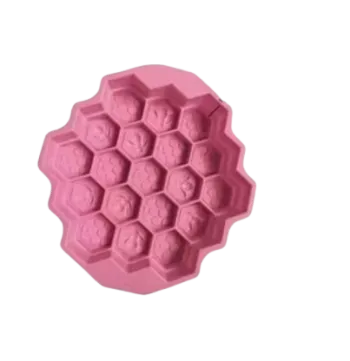
Flexible silicone soap mold - Weight: 0.04 kgThey can be reused and are dishwasher safe. They are also suitable for candle making. They can come in contact with various materials including : Beeswax , Ceramic plaster , Epoxy resin , Soy wax , Soap base , Creative cement , Paraffin , Palm wax.
€17.00Price
Flexible silicone soap mold - Weight: 0.04 kgThey can be reused and are dishwasher safe. They are also suitable for candle making. They can come in contact with various materials including : Beeswax , Ceramic plaster , Epoxy resin , Soy wax , Soap base , Creative cement , Paraffin , Palm wax.
Flexible silicone soap mold - Weight: 0.04 kgThey can be reused and are dishwasher safe. They are also suitable for candle making. They can come in contact with various materials including : Beeswax , Ceramic plaster , Epoxy resin , Soy wax , Soap base , Creative cement , Paraffin , Palm wax.
€17.00Price
To make your own beeswax candle you will need: - a silicone mold- a wick of appropriate thickness- a rubber band- a toothpick- silicone (Spray) - optional 1) Preparing the mold:We recommend spraying the mold inside with silicone spray which will make it easier to remove the candle at the end of the process. Insert the wick in the center from the bottom and pop it out from the top. Secure the mold with rubber bands to keep it tightly closed. Tie a wick to the toothpick and rest the latter on the top edge. 2) Fill the mold ocn the wax: Melt the wax in a preferably enameled pot, pour it into the mold when it has reached a temperature of 50°C. Pour it slowly into the mold. The time for the wax to solidify depends on the size of the mold and the amount of wax used. 3) Take the candle out of the mold:When the wax is cold, remove the rubber bands, open the mold and take out the candle. Remove the toothpick and cut the wick at the base of the candle, while on the top leave the wick 1 cm long. Spray the candle with silicone spray to give it shine.
€32.90Price

€32.90Price
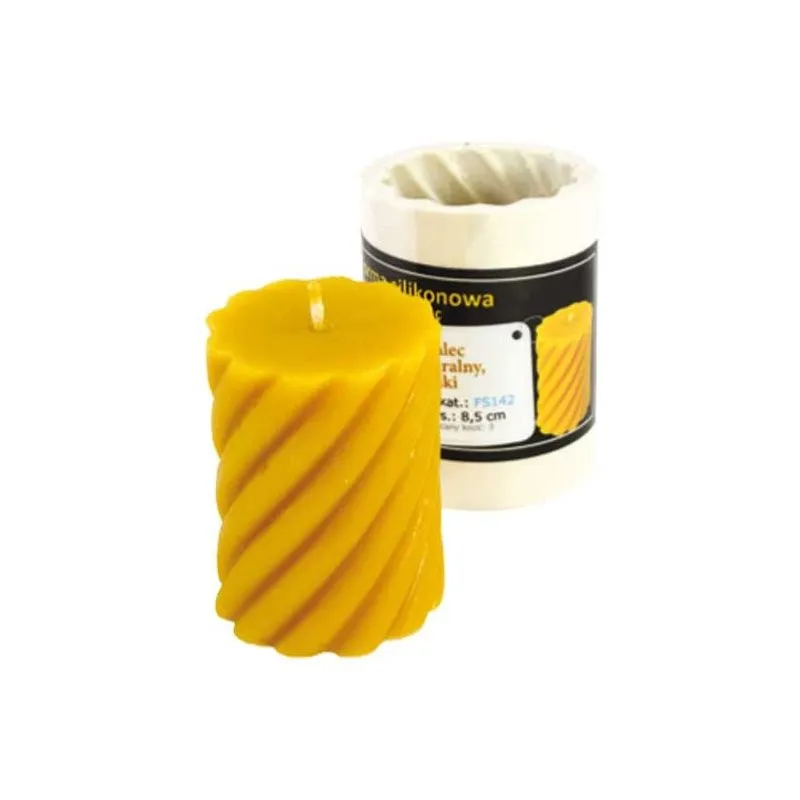
Mold height: 65 mm- Wick: 3 mm- Weight: 40 g Silicone molds can be used for processing different raw materials: beeswax, soy wax, palm wax, kerosene, epoxy, soap base. They are not suitable for food production.
€32.90Price
Mold height: 65 mm- Wick: 3 mm- Weight: 40 g Silicone molds can be used for processing different raw materials: beeswax, soy wax, palm wax, kerosene, epoxy, soap base. They are not suitable for food production.
Mold height: 65 mm- Wick: 3 mm- Weight: 40 g Silicone molds can be used for processing different raw materials: beeswax, soy wax, palm wax, kerosene, epoxy, soap base. They are not suitable for food production.
€32.90Price
€7.00Price
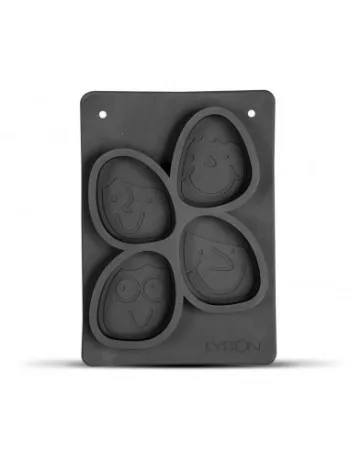
Flexible silicone soap mold
Dimensions: 23.5 cm x 8 cm x 24.4 cm
They are reusable and dishwasher safe. They are also suitable for candle making. They can come into contact with various materials, including: beeswax, ceramic plaster, epoxy resin, soy wax, soap base, creative cement, paraffin, and palm wax.
€7.00Price
Flexible silicone soap mold
Dimensions: 23.5 cm x 8 cm x 24.4 cm
They are reusable and dishwasher safe. They are also suitable for candle making. They can come into contact with various materials, including: beeswax, ceramic plaster, epoxy resin, soy wax, soap base, creative cement, paraffin, and palm wax.
€7.00Price
To make your own beeswax candle you will need: - a silicone mold- a wick of appropriate thickness- a rubber band- a toothpick- silicone (Spray) - optional 1) Preparing the mold:We recommend spraying the mold inside with silicone spray which will make it easier to remove the candle at the end of the process. Insert the wick in the center from the bottom and pop it out from the top. Secure the mold with rubber bands to keep it tightly closed. Tie a wick to the toothpick and rest the latter on the top edge. 2) Fill the mold ocn the wax: Melt the wax in a preferably enameled pot, pour it into the mold when it has reached a temperature of 50°C. Pour it slowly into the mold. The time for the wax to solidify depends on the size of the mold and the amount of wax used. 3) Take the candle out of the mold:When the wax is cold, remove the rubber bands, open the mold and take out the candle. Remove the toothpick and cut the wick at the base of the candle, while on the top leave the wick 1 cm long. Spray the candle with silicone spray to give it shine.
€30.80Price
€30.80Price
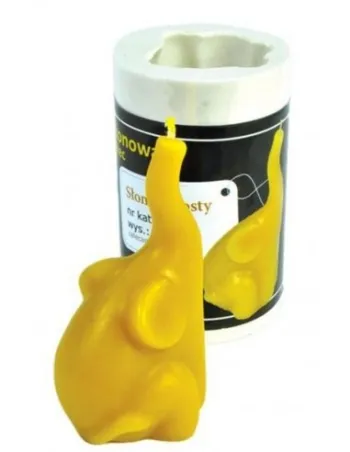
Silicone candle mold with elephantStopper: 3 mm Silicone molds can be used for processing different raw materials: beeswax, soy wax, palm wax, kerosene, epoxy, soap base. They are not suitable for food production.
€30.80Price
Silicone candle mold with elephantStopper: 3 mm Silicone molds can be used for processing different raw materials: beeswax, soy wax, palm wax, kerosene, epoxy, soap base. They are not suitable for food production.
Silicone candle mold with elephantStopper: 3 mm Silicone molds can be used for processing different raw materials: beeswax, soy wax, palm wax, kerosene, epoxy, soap base. They are not suitable for food production.
€30.80Price
To make your own beeswax candle you will need: - a silicone mold- a wick of appropriate thickness- a rubber band- a toothpick- silicone (Spray) - optional 1) Preparing the mold:We recommend spraying the mold inside with silicone spray which will make it easier to remove the candle at the end of the process. Insert the wick in the center from the bottom and pop it out from the top. Secure the mold with rubber bands to keep it tightly closed. Tie a wick to the toothpick and rest the latter on the top edge. 2) Fill the mold ocn the wax: Melt the wax in a preferably enameled pot, pour it into the mold when it has reached a temperature of 50°C. Pour it slowly into the mold. The time for the wax to solidify depends on the size of the mold and the amount of wax used. 3) Take the candle out of the mold:When the wax is cold, remove the rubber bands, open the mold and take out the candle. Remove the toothpick and cut the wick at the base of the candle, while on the top leave the wick 1 cm long. Spray the candle with silicone spray to give it shine.
€30.80Price
€30.80Price
Mold height: 55 mm - Wick: 3 mm - Weight: 60 g Silicone molds can be used for processing different raw materials: beeswax, soy wax, palm wax, kerosene, epoxy, soap base. They are not suitable for food production.
€30.80Price
Mold height: 55 mm - Wick: 3 mm - Weight: 60 g Silicone molds can be used for processing different raw materials: beeswax, soy wax, palm wax, kerosene, epoxy, soap base. They are not suitable for food production.
Mold height: 55 mm - Wick: 3 mm - Weight: 60 g Silicone molds can be used for processing different raw materials: beeswax, soy wax, palm wax, kerosene, epoxy, soap base. They are not suitable for food production.
€30.80Price
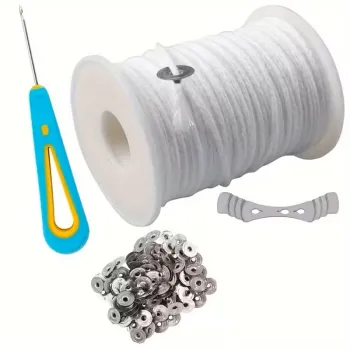
€0.28Price
Wick centering device, useful for holding the wick in place when making candles.
Length: 10 cm
€0.28Price
Wick centering device, useful for holding the wick in place when making candles.
Length: 10 cm
Wick centering device, useful for holding the wick in place when making candles.
Length: 10 cm
€0.28Price
To make your own beeswax candle you will need: - a silicone mold- a wick of appropriate thickness- a rubber band- a toothpick- silicone (Spray) - optional 1) Preparing the mold:We recommend spraying the mold inside with silicone spray which will make it easier to remove the candle at the end of the process. Insert the wick in the center from the bottom and pop it out from the top. Secure the mold with rubber bands to keep it tightly closed. Tie a wick to the toothpick and rest the latter on the top edge. 2) Fill the mold ocn the wax: Melt the wax in a preferably enameled pot, pour it into the mold when it has reached a temperature of 50°C. Pour it slowly into the mold. The time for the wax to solidify depends on the size of the mold and the amount of wax used. 3) Take the candle out of the mold:When the wax is cold, remove the rubber bands, open the mold and take out the candle. Remove the toothpick and cut the wick at the base of the candle, while on the top leave the wick 1 cm long. Spray the candle with silicone spray to give it shine.
€18.80Price
€18.80Price
Mold height: 45 mm - Wick: 3 mm - Weight: 15 g Silicone molds can be used for processing different raw materials: beeswax, soy wax, palm wax, kerosene, epoxy, soap base. They are not suitable for food production.
€18.80Price
Mold height: 45 mm - Wick: 3 mm - Weight: 15 g Silicone molds can be used for processing different raw materials: beeswax, soy wax, palm wax, kerosene, epoxy, soap base. They are not suitable for food production.
Mold height: 45 mm - Wick: 3 mm - Weight: 15 g Silicone molds can be used for processing different raw materials: beeswax, soy wax, palm wax, kerosene, epoxy, soap base. They are not suitable for food production.
€18.80Price
€2.60Price
Nylon uncapping BANK with stainless steel operculum drip filter - 60x40x28 cm TANK with stainless steel lectern (QI No. L11) and 40 mm cut-off faucet (QI No. R11)
€2.60Price
Nylon uncapping BANK with stainless steel operculum drip filter - 60x40x28 cm TANK with stainless steel lectern (QI No. L11) and 40 mm cut-off faucet (QI No. R11)
Nylon uncapping BANK with stainless steel operculum drip filter - 60x40x28 cm TANK with stainless steel lectern (QI No. L11) and 40 mm cut-off faucet (QI No. R11)
€2.60Price
To make your own beeswax candle you will need: - a silicone mold- a wick of appropriate thickness- a rubber band- a toothpick- silicone (Spray) - optional 1) Preparing the mold:We recommend spraying the mold inside with silicone spray which will make it easier to remove the candle at the end of the process. Insert the wick in the center from the bottom and pop it out from the top. Secure the mold with rubber bands to keep it tightly closed. Tie a wick to the toothpick and rest the latter on the top edge. 2) Fill the mold ocn the wax: Melt the wax in a preferably enameled pot, pour it into the mold when it has reached a temperature of 50°C. Pour it slowly into the mold. The time for the wax to solidify depends on the size of the mold and the amount of wax used. 3) Take the candle out of the mold:When the wax is cold, remove the rubber bands, open the mold and take out the candle. Remove the toothpick and cut the wick at the base of the candle, while on the top leave the wick 1 cm long. Spray the candle with silicone spray to give it shine.
€23.80Price
€23.80Price
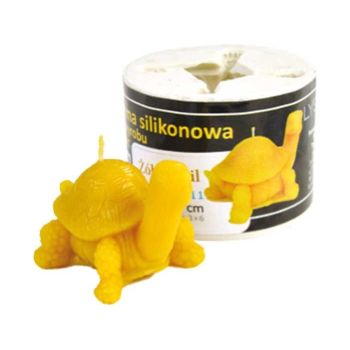
Silicone mold for turtle-shaped candle - Mold height: 45 mm Wick: 3 mm - Weight: 25 g Silicone molds can be used for processing different raw materials: beeswax, soy wax, palm wax, kerosene wax, epoxy resin, soap base. They are not suitable for food production.
€23.80Price
Silicone mold for turtle-shaped candle - Mold height: 45 mm Wick: 3 mm - Weight: 25 g Silicone molds can be used for processing different raw materials: beeswax, soy wax, palm wax, kerosene wax, epoxy resin, soap base. They are not suitable for food production.
Silicone mold for turtle-shaped candle - Mold height: 45 mm Wick: 3 mm - Weight: 25 g Silicone molds can be used for processing different raw materials: beeswax, soy wax, palm wax, kerosene wax, epoxy resin, soap base. They are not suitable for food production.
€23.80Price
€9.50Price
Nourishing, emollient and volumizing stick. Over 99% natural product. Argan oil, royal jelly and honey create a natural protective barrier on the lips. Hyaluronic acid preserves against time while giving a pleasant volume effect.
€9.50Price
Nourishing, emollient and volumizing stick. Over 99% natural product. Argan oil, royal jelly and honey create a natural protective barrier on the lips. Hyaluronic acid preserves against time while giving a pleasant volume effect.
Nourishing, emollient and volumizing stick. Over 99% natural product. Argan oil, royal jelly and honey create a natural protective barrier on the lips. Hyaluronic acid preserves against time while giving a pleasant volume effect.
€9.50Price
To make your own beeswax candle you will need: - a silicone mold- a wick of appropriate thickness- a rubber band- a toothpick- silicone (Spray) - optional 1) Preparing the mold:We recommend spraying the mold inside with silicone spray which will make it easier to remove the candle at the end of the process. Insert the wick in the center from the bottom and pop it out from the top. Secure the mold with rubber bands to keep it tightly closed. Tie a wick to the toothpick and rest the latter on the top edge. 2) Fill the mold ocn the wax: Melt the wax in a preferably enameled pot, pour it into the mold when it has reached a temperature of 50°C. Pour it slowly into the mold. The time for the wax to solidify depends on the size of the mold and the amount of wax used. 3) Take the candle out of the mold:When the wax is cold, remove the rubber bands, open the mold and take out the candle. Remove the toothpick and cut the wick at the base of the candle, while on the top leave the wick 1 cm long. Spray the candle with silicone spray to give it shine.
€21.00Price
€21.00Price
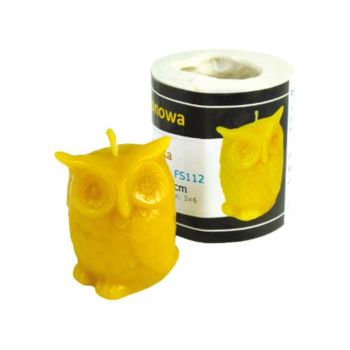
Silicone candle mold with SMALL OWL Mold height: 50 mm - Wick: 3 mm - weight: 35 g Silicone molds can be used for processing different raw materials: beeswax, soy wax, palm wax, kerosene wax, epoxy resin, soap base.They are not suitable for food production.
€21.00Price
Silicone candle mold with SMALL OWL Mold height: 50 mm - Wick: 3 mm - weight: 35 g Silicone molds can be used for processing different raw materials: beeswax, soy wax, palm wax, kerosene wax, epoxy resin, soap base.They are not suitable for food production.
Silicone candle mold with SMALL OWL Mold height: 50 mm - Wick: 3 mm - weight: 35 g Silicone molds can be used for processing different raw materials: beeswax, soy wax, palm wax, kerosene wax, epoxy resin, soap base.They are not suitable for food production.
€21.00Price
To make your own beeswax candle you will need: - a silicone mold- a wick of appropriate thickness- a rubber band- a toothpick- silicone (Spray) - optional 1) Preparing the mold:We recommend spraying the mold inside with silicone spray which will make it easier to remove the candle at the end of the process. Insert the wick in the center from the bottom and pop it out from the top. Secure the mold with rubber bands to keep it tightly closed. Tie a wick to the toothpick and rest the latter on the top edge. 2) Fill the mold ocn the wax: Melt the wax in a preferably enameled pot, pour it into the mold when it has reached a temperature of 50°C. Pour it slowly into the mold. The time for the wax to solidify depends on the size of the mold and the amount of wax used. 3) Take the candle out of the mold:When the wax is cold, remove the rubber bands, open the mold and take out the candle. Remove the toothpick and cut the wick at the base of the candle, while on the top leave the wick 1 cm long. Spray the candle with silicone spray to give it shine.
€36.00Price
€36.00Price
Mold height: 100 mm - Wick: 3 mm - Weight: 95 g Silicone molds can be used for processing different raw materials: beeswax, soy wax, palm wax, kerosene, epoxy, soap base. They are not suitable for food production.
€36.00Price
Mold height: 100 mm - Wick: 3 mm - Weight: 95 g Silicone molds can be used for processing different raw materials: beeswax, soy wax, palm wax, kerosene, epoxy, soap base. They are not suitable for food production.
Mold height: 100 mm - Wick: 3 mm - Weight: 95 g Silicone molds can be used for processing different raw materials: beeswax, soy wax, palm wax, kerosene, epoxy, soap base. They are not suitable for food production.
€36.00Price
To make your own beeswax candle you will need: - a silicone mold- a wick of appropriate thickness- a rubber band- a toothpick- silicone (Spray) - optional 1) Preparing the mold:We recommend spraying the mold inside with silicone spray which will make it easier to remove the candle at the end of the process. Insert the wick in the center from the bottom and pop it out from the top. Secure the mold with rubber bands to keep it tightly closed. Tie a wick to the toothpick and rest the latter on the top edge. 2) Fill the mold ocn the wax: Melt the wax in a preferably enameled pot, pour it into the mold when it has reached a temperature of 50°C. Pour it slowly into the mold. The time for the wax to solidify depends on the size of the mold and the amount of wax used. 3) Take the candle out of the mold:When the wax is cold, remove the rubber bands, open the mold and take out the candle. Remove the toothpick and cut the wick at the base of the candle, while on the top leave the wick 1 cm long. Spray the candle with silicone spray to give it shine.
€42.00Price
€42.00Price
Height: 100 mmWax weight: 85 gRecommended wick: 2 mmSilicone molds can be used for processing different raw materials: beeswax, soy wax, palm wax, kerosene wax, epoxy resin, soap base. They are not suitable for food production.
€42.00Price
Height: 100 mmWax weight: 85 gRecommended wick: 2 mmSilicone molds can be used for processing different raw materials: beeswax, soy wax, palm wax, kerosene wax, epoxy resin, soap base. They are not suitable for food production.
Height: 100 mmWax weight: 85 gRecommended wick: 2 mmSilicone molds can be used for processing different raw materials: beeswax, soy wax, palm wax, kerosene wax, epoxy resin, soap base. They are not suitable for food production.
€42.00Price
To make your own beeswax candle you will need: - a silicone mold- a wick of appropriate thickness- a rubber band- a toothpick- silicone (Spray) - optional 1) Preparing the mold:We recommend spraying the mold inside with silicone spray which will make it easier to remove the candle at the end of the process. Insert the wick in the center from the bottom and pop it out from the top. Secure the mold with rubber bands to keep it tightly closed. Tie a wick to the toothpick and rest the latter on the top edge. 2) Fill the mold ocn the wax: Melt the wax in a preferably enameled pot, pour it into the mold when it has reached a temperature of 50°C. Pour it slowly into the mold. The time for the wax to solidify depends on the size of the mold and the amount of wax used. 3) Take the candle out of the mold:When the wax is cold, remove the rubber bands, open the mold and take out the candle. Remove the toothpick and cut the wick at the base of the candle, while on the top leave the wick 1 cm long. Spray the candle with silicone spray to give it shine.
€56.00Price
€56.00Price
Mold height: 11.5 cm - Wick: 3 mm - Weight: 155 g Silicone molds can be used for processing different raw materials: beeswax, soy wax, palm wax, kerosene, epoxy, soap base. They are not suitable for food production.
€56.00Price
Mold height: 11.5 cm - Wick: 3 mm - Weight: 155 g Silicone molds can be used for processing different raw materials: beeswax, soy wax, palm wax, kerosene, epoxy, soap base. They are not suitable for food production.
Mold height: 11.5 cm - Wick: 3 mm - Weight: 155 g Silicone molds can be used for processing different raw materials: beeswax, soy wax, palm wax, kerosene, epoxy, soap base. They are not suitable for food production.
€56.00Price
To make your own beeswax candle you will need: - a silicone mold- a wick of appropriate thickness- a rubber band- a toothpick- silicone (Spray) - optional 1) Preparing the mold:We recommend spraying the mold inside with silicone spray which will make it easier to remove the candle at the end of the process. Insert the wick in the center from the bottom and pop it out from the top. Secure the mold with rubber bands to keep it tightly closed. Tie a wick to the toothpick and rest the latter on the top edge. 2) Fill the mold ocn the wax: Melt the wax in a preferably enameled pot, pour it into the mold when it has reached a temperature of 50°C. Pour it slowly into the mold. The time for the wax to solidify depends on the size of the mold and the amount of wax used. 3) Take the candle out of the mold:When the wax is cold, remove the rubber bands, open the mold and take out the candle. Remove the toothpick and cut the wick at the base of the candle, while on the top leave the wick 1 cm long. Spray the candle with silicone spray to give it shine.
€13.80Price
€13.80Price
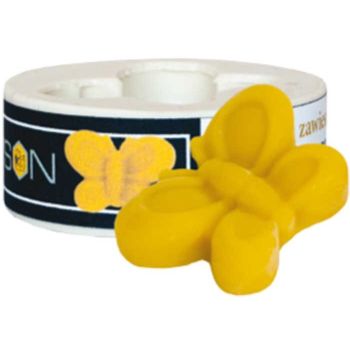
Silicone candle mold with DANGING BUTTERFLY Mold height: 45 mm Weight 10 gRecommended wick: 2 mm Silicone molds can be used for processing different raw materials: beeswax, soy wax, palm wax, kerosene wax, epoxy resin, soap base. They are not suitable for food production.
€13.80Price
Silicone candle mold with DANGING BUTTERFLY Mold height: 45 mm Weight 10 gRecommended wick: 2 mm Silicone molds can be used for processing different raw materials: beeswax, soy wax, palm wax, kerosene wax, epoxy resin, soap base. They are not suitable for food production.
Silicone candle mold with DANGING BUTTERFLY Mold height: 45 mm Weight 10 gRecommended wick: 2 mm Silicone molds can be used for processing different raw materials: beeswax, soy wax, palm wax, kerosene wax, epoxy resin, soap base. They are not suitable for food production.
€13.80Price
To make your own beeswax candle you will need: - a silicone mold- a wick of appropriate thickness- a rubber band- a toothpick- silicone (Spray) - optional 1) Preparing the mold:We recommend spraying the mold inside with silicone spray which will make it easier to remove the candle at the end of the process. Insert the wick in the center from the bottom and pop it out from the top. Secure the mold with rubber bands to keep it tightly closed. Tie a wick to the toothpick and rest the latter on the top edge. 2) Fill the mold ocn the wax: Melt the wax in a preferably enameled pot, pour it into the mold when it has reached a temperature of 50°C. Pour it slowly into the mold. The time for the wax to solidify depends on the size of the mold and the amount of wax used. 3) Take the candle out of the mold:When the wax is cold, remove the rubber bands, open the mold and take out the candle. Remove the toothpick and cut the wick at the base of the candle, while on the top leave the wick 1 cm long. Spray the candle with silicone spray to give it shine.
€15.00Price
€15.00Price
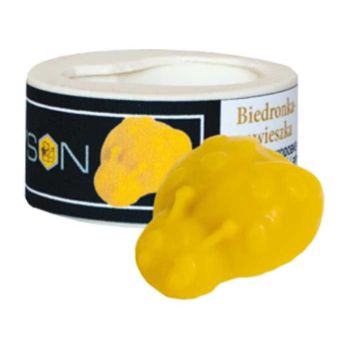
COCCINELLA CANDLE mold 10 mm high length 45mmMold height: 22 mmRecommended wick: 2 mmSilicone molds can be used for processing different raw materials: beeswax, soy wax, palm wax, kerosene wax, epoxy resin, soap base. They are not suitable for food production.
€15.00Price
COCCINELLA CANDLE mold 10 mm high length 45mmMold height: 22 mmRecommended wick: 2 mmSilicone molds can be used for processing different raw materials: beeswax, soy wax, palm wax, kerosene wax, epoxy resin, soap base. They are not suitable for food production.
COCCINELLA CANDLE mold 10 mm high length 45mmMold height: 22 mmRecommended wick: 2 mmSilicone molds can be used for processing different raw materials: beeswax, soy wax, palm wax, kerosene wax, epoxy resin, soap base. They are not suitable for food production.
€15.00Price
To make your own beeswax candle you will need: - a silicone mold- a wick of appropriate thickness- a rubber band- a toothpick- silicone (Spray) - optional 1) Preparing the mold:We recommend spraying the mold inside with silicone spray which will make it easier to remove the candle at the end of the process. Insert the wick in the center from the bottom and pop it out from the top. Secure the mold with rubber bands to keep it tightly closed. Tie a wick to the toothpick and rest the latter on the top edge. 2) Fill the mold ocn the wax: Melt the wax in a preferably enameled pot, pour it into the mold when it has reached a temperature of 50°C. Pour it slowly into the mold. The time for the wax to solidify depends on the size of the mold and the amount of wax used. 3) Take the candle out of the mold:When the wax is cold, remove the rubber bands, open the mold and take out the candle. Remove the toothpick and cut the wick at the base of the candle, while on the top leave the wick 1 cm long. Spray the candle with silicone spray to give it shine.
€33.50Price
€33.50Price
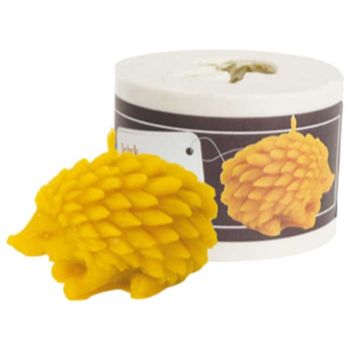
Silicone candle mold with RICCIOMold height: 8.5 cmWeight: 190 gRecommended wick: 2 mmSilicone molds can be used for processing different raw materials: beeswax, soy wax, palm wax, kerosene wax, epoxy resin, soap base. They are not suitable for food production.
€33.50Price
Silicone candle mold with RICCIOMold height: 8.5 cmWeight: 190 gRecommended wick: 2 mmSilicone molds can be used for processing different raw materials: beeswax, soy wax, palm wax, kerosene wax, epoxy resin, soap base. They are not suitable for food production.
Silicone candle mold with RICCIOMold height: 8.5 cmWeight: 190 gRecommended wick: 2 mmSilicone molds can be used for processing different raw materials: beeswax, soy wax, palm wax, kerosene wax, epoxy resin, soap base. They are not suitable for food production.
€33.50Price
To make your own beeswax candle you will need: - a silicone mold- a wick of appropriate thickness- a rubber band- a toothpick- silicone (Spray) - optional 1) Preparing the mold:We recommend spraying the mold inside with silicone spray which will make it easier to remove the candle at the end of the process. Insert the wick in the center from the bottom and pop it out from the top. Secure the mold with rubber bands to keep it tightly closed. Tie a wick to the toothpick and rest the latter on the top edge. 2) Fill the mold ocn the wax: Melt the wax in a preferably enameled pot, pour it into the mold when it has reached a temperature of 50°C. Pour it slowly into the mold. The time for the wax to solidify depends on the size of the mold and the amount of wax used. 3) Take the candle out of the mold:When the wax is cold, remove the rubber bands, open the mold and take out the candle. Remove the toothpick and cut the wick at the base of the candle, while on the top leave the wick 1 cm long. Spray the candle with silicone spray to give it shine.
€15.00Price
To make your own beeswax candle you will need: - a silicone mold- a wick of appropriate thickness- a rubber band- a toothpick- silicone (Spray) - optional 1) Preparing the mold:We recommend spraying the mold inside with silicone spray which will make it easier to remove the candle at the end of the process. Insert the wick in the center from the bottom and pop it out from the top. Secure the mold with rubber bands to keep it tightly closed. Tie a wick to the toothpick and rest the latter on the top edge. 2) Fill the mold ocn the wax: Melt the wax in a preferably enameled pot, pour it into the mold when it has reached a temperature of 50°C. Pour it slowly into the mold. The time for the wax to solidify depends on the size of the mold and the amount of wax used. 3) Take the candle out of the mold:When the wax is cold, remove the rubber bands, open the mold and take out the candle. Remove the toothpick and cut the wick at the base of the candle, while on the top leave the wick 1 cm long. Spray the candle with silicone spray to give it shine.
€15.00Price
€15.00Price
Mold Height: 55 mm - Weight: 15 gRecommended Mold: 2 mmSilicone molds can be used for processing different raw materials: beeswax, soy wax, palm wax, kerosene, epoxy, soap base. They are not suitable for food production.
€15.00Price
Mold Height: 55 mm - Weight: 15 gRecommended Mold: 2 mmSilicone molds can be used for processing different raw materials: beeswax, soy wax, palm wax, kerosene, epoxy, soap base. They are not suitable for food production.
Mold Height: 55 mm - Weight: 15 gRecommended Mold: 2 mmSilicone molds can be used for processing different raw materials: beeswax, soy wax, palm wax, kerosene, epoxy, soap base. They are not suitable for food production.
€15.00Price
To make your own beeswax candle you will need: - a silicone mold- a wick of appropriate thickness- a rubber band- a toothpick- silicone (Spray) - optional 1) Preparing the mold:We recommend spraying the mold inside with silicone spray which will make it easier to remove the candle at the end of the process. Insert the wick in the center from the bottom and pop it out from the top. Secure the mold with rubber bands to keep it tightly closed. Tie a wick to the toothpick and rest the latter on the top edge. 2) Fill the mold ocn the wax: Melt the wax in a preferably enameled pot, pour it into the mold when it has reached a temperature of 50°C. Pour it slowly into the mold. The time for the wax to solidify depends on the size of the mold and the amount of wax used. 3) Take the candle out of the mold:When the wax is cold, remove the rubber bands, open the mold and take out the candle. Remove the toothpick and cut the wick at the base of the candle, while on the top leave the wick 1 cm long. Spray the candle with silicone spray to give it shine.
€35.80Price
€35.80Price
Mold height: 65mm - Mold diameter: 40mm - Wick: 3mm Silicone molds can be used for processing different raw materials: beeswax, soy wax, palm wax, kerosene, epoxy, soap base. They are not suitable for food production.
€35.80Price
Mold height: 65mm - Mold diameter: 40mm - Wick: 3mm Silicone molds can be used for processing different raw materials: beeswax, soy wax, palm wax, kerosene, epoxy, soap base. They are not suitable for food production.
Mold height: 65mm - Mold diameter: 40mm - Wick: 3mm Silicone molds can be used for processing different raw materials: beeswax, soy wax, palm wax, kerosene, epoxy, soap base. They are not suitable for food production.
€35.80Price
To make your own beeswax candle you will need: - a silicone mold- a wick of appropriate thickness- a rubber band- a toothpick- silicone (Spray) - optional 1) Preparing the mold:We recommend spraying the mold inside with silicone spray which will make it easier to remove the candle at the end of the process. Insert the wick in the center from the bottom and pop it out from the top. Secure the mold with rubber bands to keep it tightly closed. Tie a wick to the toothpick and rest the latter on the top edge. 2) Fill the mold ocn the wax: Melt the wax in a preferably enameled pot, pour it into the mold when it has reached a temperature of 50°C. Pour it slowly into the mold. The time for the wax to solidify depends on the size of the mold and the amount of wax used. 3) Take the candle out of the mold:When the wax is cold, remove the rubber bands, open the mold and take out the candle. Remove the toothpick and cut the wick at the base of the candle, while on the top leave the wick 1 cm long. Spray the candle with silicone spray to give it shine.
€35.80Price
€35.80Price
Mold height: 45 mm - Wick: 2 mm - Weight: 45 g Silicone molds can be used for processing different raw materials: beeswax, soy wax, palm wax, kerosene, epoxy, soap base. They are not suitable for food production.
€35.80Price
Mold height: 45 mm - Wick: 2 mm - Weight: 45 g Silicone molds can be used for processing different raw materials: beeswax, soy wax, palm wax, kerosene, epoxy, soap base. They are not suitable for food production.
Mold height: 45 mm - Wick: 2 mm - Weight: 45 g Silicone molds can be used for processing different raw materials: beeswax, soy wax, palm wax, kerosene, epoxy, soap base. They are not suitable for food production.
€35.80Price
To make your own beeswax candle you will need: - a silicone mold- a wick of appropriate thickness- a rubber band- a toothpick- silicone (Spray) - optional 1) Preparing the mold:We recommend spraying the mold inside with silicone spray which will make it easier to remove the candle at the end of the process. Insert the wick in the center from the bottom and pop it out from the top. Secure the mold with rubber bands to keep it tightly closed. Tie a wick to the toothpick and rest the latter on the top edge. 2) Fill the mold ocn the wax: Melt the wax in a preferably enameled pot, pour it into the mold when it has reached a temperature of 50°C. Pour it slowly into the mold. The time for the wax to solidify depends on the size of the mold and the amount of wax used. 3) Take the candle out of the mold:When the wax is cold, remove the rubber bands, open the mold and take out the candle. Remove the toothpick and cut the wick at the base of the candle, while on the top leave the wick 1 cm long. Spray the candle with silicone spray to give it shine.
€39.80Price
€39.80Price
Mold height: 10.5cm - Diameter: 6.3 cm - Circumference: 19.5 cm- Wick: 3 mm - Weight: 39 g Silicone molds can be used for processing different raw materials: beeswax, soy wax, palm wax, kerosene wax, epoxy resin, soap base. They are not suitable for food production.
€39.80Price
Mold height: 10.5cm - Diameter: 6.3 cm - Circumference: 19.5 cm- Wick: 3 mm - Weight: 39 g Silicone molds can be used for processing different raw materials: beeswax, soy wax, palm wax, kerosene wax, epoxy resin, soap base. They are not suitable for food production.
Mold height: 10.5cm - Diameter: 6.3 cm - Circumference: 19.5 cm- Wick: 3 mm - Weight: 39 g Silicone molds can be used for processing different raw materials: beeswax, soy wax, palm wax, kerosene wax, epoxy resin, soap base. They are not suitable for food production.
€39.80Price